Check readiness before commanding movement
Confirm assembly, wiring, unique servo IDs and joint zero calibration are complete. Calibration is a prerequisite, not a way to compensate for an incorrectly assembled joint. The calibration pose is not a standing pose.
Identify your installed application: basic Microduck Robot or Microduck Robot AI. Keep a record of the application version and kit edition; original Pollen Microduck instructions do not automatically apply to this hardware.
Find your board, then open its control page
For computer setup, use a USB data connection and verify that Arduino App Lab recognizes the intended board. Check the selected device and its network details; Network Info shows the assigned address. Your computer must be able to reach that board on its network.
- Run the installed Microduck Robot application in Arduino App Lab and wait for successful startup rather than only a connected-device indicator.
- Open http://<device-IP>:9527/ with your actual address. http://192.168.2.97:9527/ is only the source example, never a universal address.
- For Microduck Robot AI, http://<device-IP>/ is the cockpit; :9527 is the motion interface. AI USB Host configuration can disconnect the computer USB link: verify network access against the matching installation guide.
Confirm the standing pose
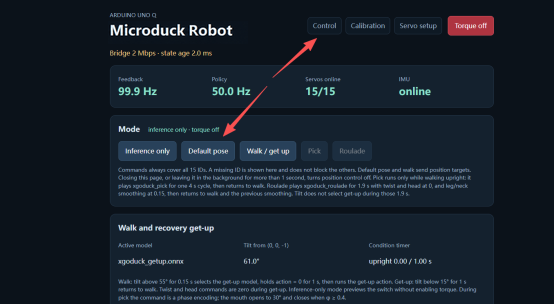
With all joints calibrated, open Control and select Default pose. Confirm that the robot can hold the expected standing posture before attempting to walk. Do not treat an upright-looking screenshot as proof that your own joint offsets are correct.
If the robot cannot stand, stop the sequence and check the assembly/calibration guide and joint status. Do not repeatedly start the walking policy to mask a calibration problem.
Make the first movement on the floor
After confirming the standing pose, disconnect the USB Type-C cable as described in the source and place the robot on the floor, away from elevated edges. Recheck that the browser connection still works.
- Select Walk / get up to load the walking and get-up policies. Use the virtual joystick for a small initial movement, then return the command to zero.
- Watch the current policy, joint feedback and IMU state. The browser also supports directional and turning commands; follow the controls shown by your installed version.
- The documented torque-off control or space bar disables torque. Support the robot when needed: disabling torque does not keep it standing. Leaving the page, backgrounding it or a control timeout stops position control; this is not a guaranteed standing hold.
Use only the modules your kit includes
Basic-kit operation covers movement and calibration. The full kit adds audio, camera and ToF hardware and uses the matching Microduck Robot AI setup. A motion page alone does not prove those modules or services are installed.
For audio, follow the project’s account/agent binding instructions. For camera and ToF, first check module presence and the AI cockpit. Forward obstacle avoidance is a specific mode, not a guarantee of autonomous navigation.
Running a policy is different from training one
Ordinary browser control uses a trained policy running on the robot; it does not require a separate GPU computer. Custom policy training uses the xgoduck_rl environment and requires a suitable CUDA-capable GPU computer.
A training task appearing in a repository is not proof that your installed runtime supports it. Check model, task and runtime compatibility before trying a custom policy.
Diagnose the failed stage before changing software
Keep the error message, selected board, actual IP, application version and failing step together when requesting project support.
Scroll sideways to compare all columns.
| Symptom | First check |
|---|---|
| No browser page | Recheck the actual IP, port, application startup and computer-to-board network reachability. Do not replace the IP with the example. |
| Page loads, movement does not | Check the active mode, torque state, servo online status and completed calibration; stop if posture is wrong. |
| No camera, audio or ToF | Confirm full-kit hardware, AI application and its cockpit setup; compare the installed version with the linked guide. |
| Instructions do not match the interface | Record the release/branch and use its documentation. Do not guess reset values or flash another project’s firmware. |
Understand the demonstrated limits
The source describes walking, recovery and a triggered pickup action. Pickup is a pretrained movement, not object recognition or autonomous object seeking. Recovery depends on the documented policy conditions.
Treat this guide as a documentation-based workflow. It provides no factory password, universal reset procedure or guarantee that every hardware revision behaves identically. Consult the linked project instructions for installation and updates.